An Introduction to Troemner OIML Weights
In this article, we will focus on OIML Class E1, Class E2, Class F1, and Class F2 weights. These weights are typically used for routine testing and calibration of analytical balances and other laboratory balances as well as calibration of other weights.
If you are looking for OIML Class E0, explore our precision Reference Weights and Mass Standards. With Class E0 weights having ½ the tolerance of Class E1, these weights are typically used as a primary reference for calibrating other mass standards where the stability of the environment and careful handling are assured. This class is appropriate for calibrating high-precision balances with a readability as low as 0.01 mg.
OIML Weights Overview
If there is an analytical balance in a laboratory, there will be a need for weights. Weights are essential for routine checking and calibration of weighing devices including micro balances, analytical balances, precision balances, top loading balances, and other masses in a laboratory. Through a series of measurements weights are used to ensure laboratory balances are providing dependable and accurate readings and are a crucial element in a laboratory’s mass measurement assurance program. Industries such as biotechnology, pharmaceutical, food processing, agriculture, cosmetics, general research and development, and manufacturing rely on balances or scales with weights in their daily operations.
Each Calibration Weight has specific characteristics defined by the internationally recognized weight standard OIML R111, Weights of Class E1, E2, F1, F2, M1, M1-2, M2, M2-3 and M3. The class of the weight is a key characteristic with a stated maximum permissible error, also known as tolerance or accuracy of the weight.
The general recommendation is the accuracy of the Calibration Weight should be at least equal to 1/3 the readability of the balance or scale. Therefore, the readability of the weighing device determines the precision of the Calibration Weight. A review of the weight standards then identifies the weight class that is necessary for the Calibration Weight for a particular balance or scale.
Accreditation
Accreditation is the independent evaluation of conformity against recognized standards to conduct specific activities to ensure impartiality and competence. Through the application of national and international standards, governments, procurers, and consumers can have confidence in the calibration and test results, inspection reports and certifications provided.
For calibrated weights, accreditation ensures all mass laboratories are playing by the same rules to perform calibrations. All Calibration Laboratories must meet the requirements of the same standard with an external third party making sure the rules are followed.
International Standards
ISO - International Organization for Standardization
ISO is the world’s largest developer of voluntary International Standards. International Standards give state of the art specifications for products, services, and good practices. ISO is an independent, non-government organization that develops the standards through global consensus practices.
ISO/IEC 17025 – General Requirements for the competence of testing and calibration laboratories
ISO/IEC 17025 specifies the general requirements for the quality and competence to conduct tests and/or calibrations and delivering consistent, reliable results. It is applicable to all organizations performing tests and/or calibrations.
NVLAP – National Voluntary Laboratory Accreditation Program
NVLAP (National Voluntary Laboratory Accreditation Program (NVLAP) | NIST) falls under the guidance of NIST (National Institute of Standards and Technology (nist.gov)), part of the U.S. Department of Commerce. NVLAP accreditation audits ensure a calibration laboratory’s compliance to ISO/IEC 17025 and NIST Handbook 150. This independent, third part assessment ensures the science of measurement and laboratory processes are sound and consistently followed.
Troemner ISO 17025 Certificate
Troemner NVLAP Scope of Accreditation to ISO/IEC 17025:2017, NVLAP Lab Code 105013-0
International Calibration Weight Standard
OIML R111, Weights of Class E1, E2, F1, F2, M1, M1-2, M2, M2-3 and M3
OIML Weights conform to the standards of the Organisation Internationale de Metrologie Legale International Recommendation 111 (OIML R 111). These Weights are available in Class E1, E2, Class F1 and Class F2 and meet or exceed the requirements of the standard.
In the OIML R 111 standard, the weight specifications are designed so the requirements for surface finish, markings, construction, material density and magnetic properties become more restrictive as weight tolerances decrease to enable the weight to maintain its tolerance over time. The tolerances for the various classes are established in a manner that enables the weights of higher classes to calibrate weights of the next lower class.
Explore OIML Weights
OIML Weight Styles and Construction
Shop OIML Class E1-F2 Knob Style Calibration WeightsOIML Gram and Kilogram Style Weights
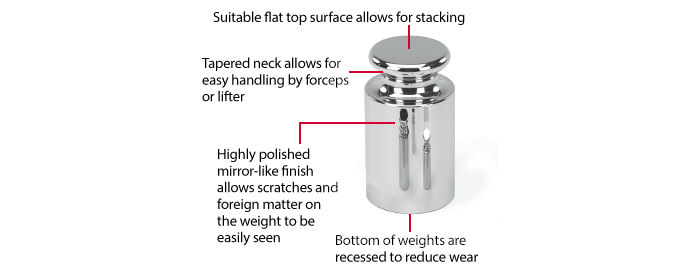
Troemner OIML Weights 1 g and larger consist of a body and a lifting knob. The lifting knob is specifically designed for use with forceps or other lifting device. Weight bottoms are slightly recessed to expose the smallest possible area to wear. Each calibration weight is marked with its nominal value for OIML F1, F2. OIML Classes E1 and E2 are not marked.
OIML Weight Style

Troemner OIML Weights are available in either one-piece or two-piece construction as defined by the standard and weight class.
One-piece construction indicates the Calibration Weight is manufactured from a single uniform piece of stainless steel, the weight has no other material added to it, and it has no method of adjustment other than removing material by polishing. OIML Class E1 and E2 weights 1 g and larger are of one-piece construction.
Two-piece construction means the Calibration Weight is made of multiple pieces of stainless steel. Troemner OIML Classes F1, F2 weights 1 g and larger are produced from two pieces of material. The body of the weight is the primary piece, and the knob of the weight is the secondary piece. The knob has a thread that screws into the body and is tightened. There is a cavity below the knob thread in the body which contains adjusting material, typically the same material from which the weight is made.
All surfaces are polished to a perfect, mirror-like finish and conform to specifications in OIML R111. The mirror-finish is an ultra-smooth surface with no visible imperfections. This surface is easier to maintain and clean over time and with proper handling will resist the buildup of material; thus, maintaining the mass value of the weight.
Milligram Weights
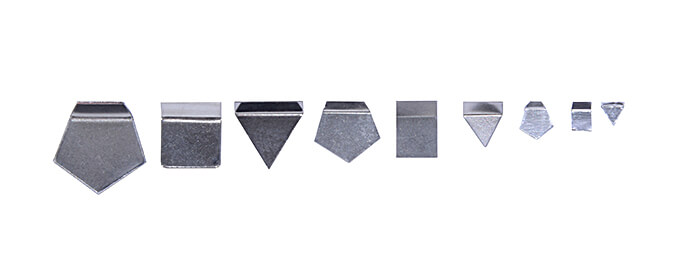
Troemner Precision Milligram Flat Weights 500 mg and below are sheet metal and one-piece construction with one side turned up to make them easy to handle with forceps. Milligram weights are marked with their nominal value for OIML Class F1 and F2. OIML E1 and Class E2 are not marked.

Milligram Wire Weights
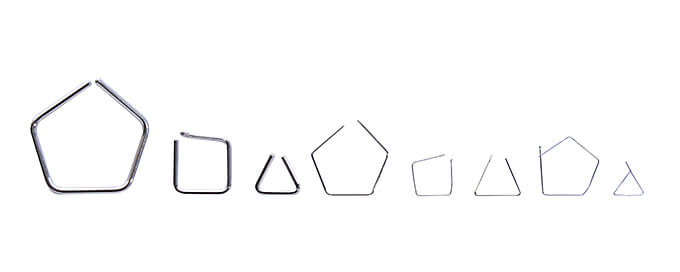
Troemner Precision Milligram Wire Weights 500 mg and below are also available in wire construction with the shape denoting the nominal value according to the table below. These weights are constructed with one end turned up to allow for easy handling with forceps.

|
Shape |
Denomination |
|
Pentagon |
500 mg, 50 mg, 5 mg |
|
Square |
200 mg, 20 mg, 2 mg |
|
Triangle |
100 mg, 10 mg, 1 mg |
OIML Weight Materials
Troemner Alloy 8
In 2003, Troemner began manufacturing stainless steel weights using a new, unique material specifically designed to meet the many demands required of weights. Weights require consistent density, low magnetic properties, extremely smooth surface finish and high hardness to prevent wear. Intensive research and testing of various stainless steels identified the optimal material to manufacture weights and resulted in Troemner Alloy 8 Stainless Steel. This is the finest commercially available stainless steel for high precision weights and mass standards. In fact, Alloy 8 meets and exceeds all stainless-steel material specifications NBS (now NIST) specified when purchasing the original U.S. state laboratory mass standards over 60 years ago.
Troemner OIML weights made from Alloy 8 Stainless Steel provide you with the following benefits:
Low Magnetic Properties – The most important attribute of Troemner Alloy 8 is its extremely low magnetic properties. The magnetic susceptibility specification for Troemner Alloy 8 exceeds the published requirements in OIML R111. A magnetized weight may affect a balance’s weighing cells introducing errors into the measurement process. Troemner Alloy 8 prevents these problems.
Consistent Density – Troemner Alloy 8 is purchased as bar stock and then fabricated into OIML weights through Troemner’s in-house Machine Shop. Purchasing bars of material assures consistency in the material density across the weights formed from that bar. Troemner reports a density of 8.03 g/cm3 for Alloy 8. This value was established after testing many samples using our NVLAP accredited density determination calibration process (NVLAP Lab Code 105013-0). This material consistency is important when weights are subsequently recalibrated after the initial sale due to the reported density is used to make buoyancy corrections during calibrations. Variations in material density can influence the calibrated value assigned to weights.
Surface Finish and Hardness – Troemner Alloy 8 is significantly harder than other stainless steels. The benefit to the user of a harder material is it is less susceptible to wear and scratches. A weight made of harder stainless steel is less likely to lose enough mass to move it out of its adjusted tolerance value.
Troemner OIML weights manufactured with Alloy 8 are:
OIML R111
- Class E1 and E2, Nominal values 1 g thru 20 kg
- Classes F1 and F2, Nominal values 1 g thru 1 kg
Overall, a Calibration Weight manufactured using Troemner Alloy 8 will have extremely low magnetic properties, consistent density, and the mirror-like highly polished finish you have come to expect from Troemner to meet today’s rigorous laboratory requirements.
Advantages of Using Weights Made from Troemner Alloy 8 Stainless Steel
316 Stainless Steel
For larger nominal values and wire style milligram weights Troemner uses 316 Stainless Steel. 316 Stainless Steel is an austenitic, corrosion-resistant steel that has high strength and hardness properties. This blend of stainless steel is highly resistant to pitting and corrosion and when polished will have a perfect mirror-like finish. This grade of stainless steel also has excellent, consistent density at 7.95 g/cm3 which is particularly important in the production of OIML weights. The density and resistance to magnetism of this material meet the exacting requirements of the OIML R111 weight standard.
Troemner OIML weights manufactured with 316 Stainless Steel
OIML R111
- Class E1 and E2, Nominal value 50 kg
- Classes F1 and F2, Nominal values 2 kg – 50 kg
3003 – H14 Aluminum
3003 – H14 Aluminum is an alloy that is used at Troemner for our smallest milligram weights. This material can be found in a variety of applications throughout many industries. This material is corrosion resistant and has a consistent density of 2.7 g/cm3 meeting the requirements in the OIML R111 standard for milligram weights.
Calibration Weight Styles, Classes, and Typical Markets
|
Weight Style |
OIML |
Suggested Markets |
|
OIML Weights |
OIML R111 |
Pharmaceutical, Biotech, Nanotechnology, Life Science Forensic and Nuclear Industries |
|
OIML Cal Paks |
OIML Class E2, F1 |
Three weights in a set for maintenance of analytical balances and other laboratory balances |
Nominal Value Ranges
Troemner offers an extensive selection of individual OIML weights and weight sets that meet the requirements of OIML R111. Whether you need just one weight or a full set, Troemner has precisely what you need for your Laboratory.
OIML Weights
|
OIML R111 Class |
Individual Weights |
Weight Sets** |
|
E1, E2 |
50 kg to 0.5 mg |
Largest set range 50 kg to 1 mg |
|
F1, F2 |
50 kg to 0.5 mg |
Largest set range 50 kg to 1 mg |
** Troemner weight sets are supplied in a 5-2-2-1 series. 5-2-2-1 means that weights beginning with a “2” are doubled in each decade and weights beginning with a “5” and “1” are single in each decade.
Example: a set with 5-2-2-1 series from 50 g to 1 g includes one 50 g, two 20 g, one 10 g, one 5 g, two 2 g, and one 1 g.
FAQ's
What should I keep in mind when selecting Calibration Weights?
There are several classes, shapes, styles, construction, materials, and sizes available to meet your needs.
Selecting the proper calibration weight for your application can be confusing given the number of weight classes, designs, and materials available. The following information can help in your weight selection process.
The following issues need to be considered when selecting weights:
1. Application Accuracy
The correct weight for an application should be more accurate than the precision of the weighing device and must be more accurate than the required precision of your measurement result. It is recommended that a weight have an accuracy that is one-third of the measurement device readability and/or your measurement accuracy requirement.
2. Environment
Temperature and humidity can impact the stability of weights. We recommend stainless steel weights for applications in environments that have excess moisture. Stainless steel weights are much less prone to physical change as compared to cast iron.
Cleanliness of the environment can impact how stable your weights will be over time. Environments with excessive airborne matter, such as dust, can impact the stability of weights. The smoother the surface of a weight, the easier it is to see foreign matter so it can be removed.
3. Reported Uncertainty on Calibration
The uncertainty reported on a calibration is just as important as the measured value itself. The uncertainty provides the statistical confidence that a laboratory has on its calibration process.
The larger the uncertainty, the less confidence in the measured value. It is also important to realize that a measured value added to its associated uncertainty must be less than the tolerance for the weight to be considered within class tolerance.
Learn more about weight uncertainties at https://www.troemner.com/calibration-uncertainty and weight tolerances at https://www.troemner.com/reference-center/weights-reference-center/calibration-weight-tolerance.
4. Certification
Troemner offers a variety of calibration certificates to meet your specific needs for certified weights for calibration. Certificates are described in detail at Certificate Options.
5. Special Design or Construction
Troemner manufactures a variety of special application weights, such as weights with hooks or weights that can be stacked on a hanger to build up the total weight. Keep in mind that if you do not see what you need, please contact a Troemner Sales Representative to discuss your special weight requirements.
6. How Often Should I Have My Weights Calibrated? Why? Are There Any Regulations and/or Standards Pertaining to Calibration Intervals?
It is recommended that if you use your weights infrequently to moderately, you should have them recalibrated once a year. However, if your weights are used very frequently or several times a day, then you should have them calibrated once every six months. Although there are no standards or regulations that specifically address recalibration intervals, this is the industry norm to ensure that these standards are still within their specified tolerances. It is not unusual to see significant “as found” failure rates on those weights that are not recalibrated on an annual basis.
Have other specifics questions, explore additional FAQs in the Weights Reference Center or for more general questions, explore the complete list of FAQs


